
I know this isn't the newest idea on the block (heck, Alton Brown made one of these things), but I thought I'd post a writeup of my home-made electric smoker with PID temperature control, because it's slightly different from the standard version.
WARNINGS:
Before I get started, I'd like to offer a couple of warnings.
This project requires messing around with 115v mains current.
This project involves VERY hot items, and a definite possibility of fires, do NOT operate this thing indoors, or anywhere flammable.
I assume no responsibility whatsoever for anything you may do or that may happen as a result of your attempts to follow this build process
MATERIALS:
- 2 large ceramic planters
- hot plate
- bricks
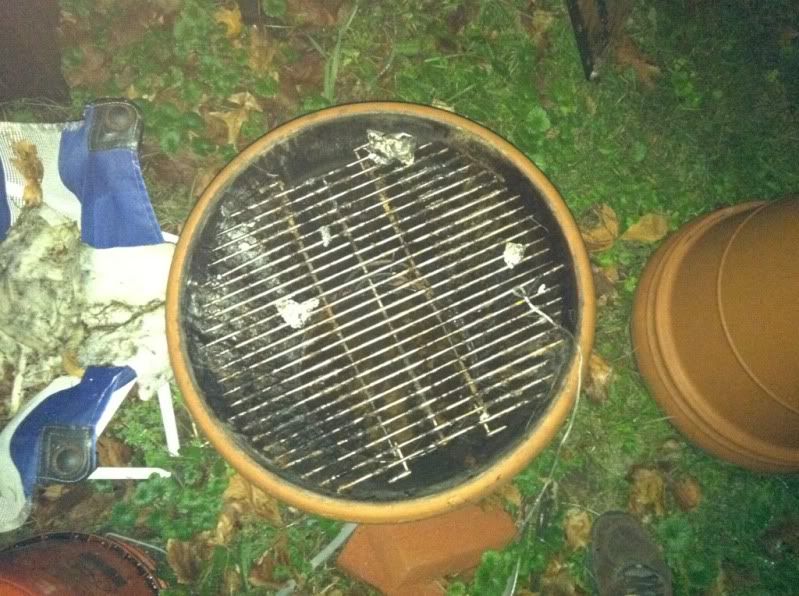
- grate
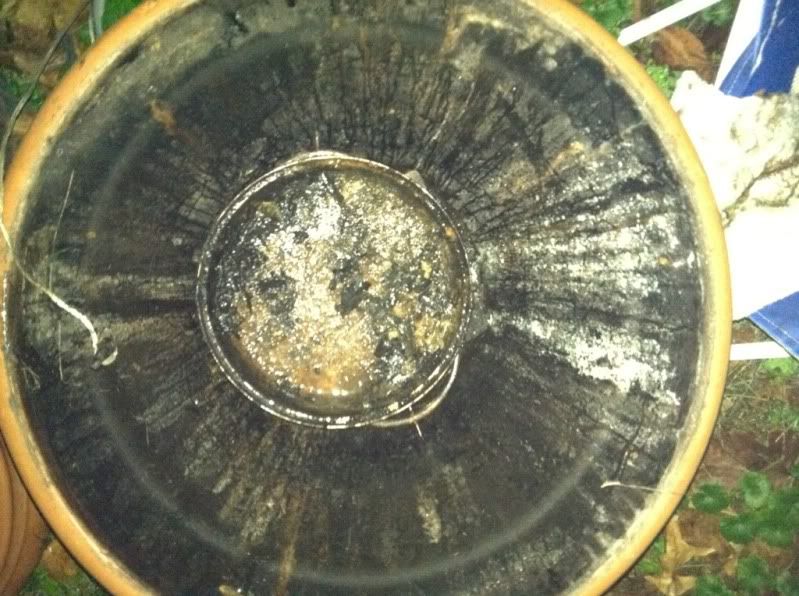
- chip pan
- water dish
- PID temperature controller and thermocouple
- Solid state relay
- enclosure
- high amperage quick connector
That's all you NEED to make this run (need is a questionable word. you can do all of this without the PID or anything like that, but that's boring) . The following items are things that I've added that make things easier to deal with.
- remote meat thermometer
- datalogging
CONSTRUCTION:
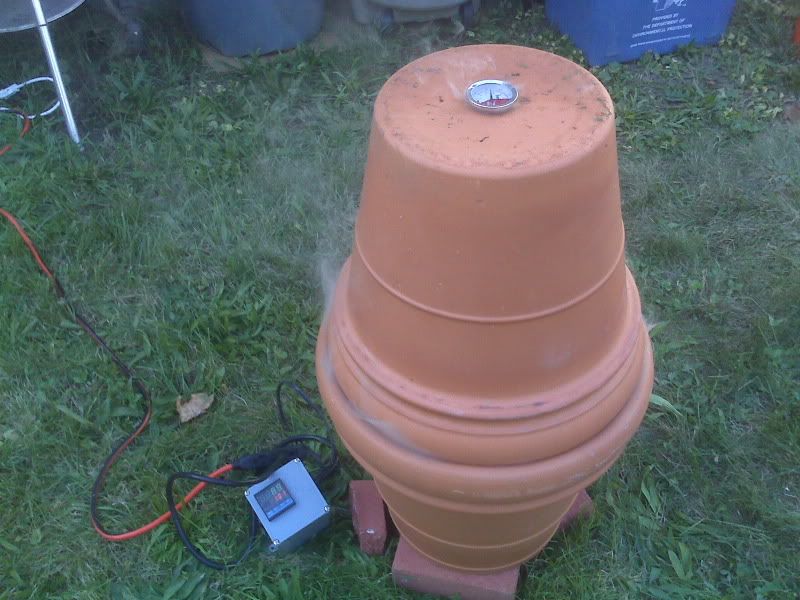
Most of this is very straightforward. Set the bottom planter on some bricks, pull the heating element out of the hot plate and put it on some brick pieces inside the bottom planter. Try to make it nice and stable. My hot plate had some temp control electronics (a simple bi-metallic strip) and a lamp attached to it. I ditched all that, but kept the fiber-coated heat resistant wiring. I ran the hi-temp wires from the hot plate element through the bottom hole, where I soldered them to some standard heavy wire to form the hot plate power cord. The chip pan goes straight on top of the hot plate element, the grate wedges in to the bottom planter, and the top planter just sits right on top.
At this point, you could just plug the hot plate in, and the whole thing would get VERY hot (350-400*F at least), and you'd probably burn out the hot plate element after a while. What you need is some sort of temperature control. The hot plate likely came with a simple bi metallic strip and knob. The problem with using these is that there's really no simple, effective way to do it. If you put the knob/strip outside the planter, it never gets hot and doesn't do anything. If you put it inside, it's impossible to adjust without largely disassembling everything and probably burning all the hair off your hand. Further, if you move the strip physically a few inches toward or away from the element, your temp control completely changes. And finally, even if you can get it all nailed down, it's still complete trial and error trying to get the temperature set to where you want it, and you've got no way to adjust for temperature creeping up or down without physically being there to fiddle with it. This is where our friend the PID temperature controller comes in.
WIRING/PID HOOKUP:
The remaining construction involves hooking up the PID.
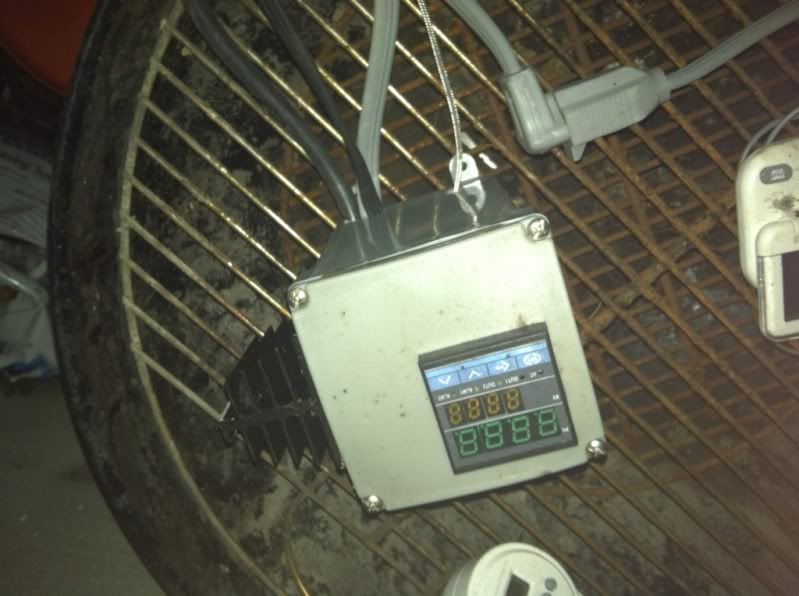
PID Power:
The PID runs off of standard wall current, so you could have just one plug that powers both the PID and the hot plate. For various reasons, I chose to have them separate. One plug powers up the PID, and a different one feeds power through the temp controller to the hot plate. This way I can have the PID on and mess with it's settings without having mains voltage elsewhere in the box. Anyway, run power to the appropriate terminals on teh back of the PID.
Thermocouple:
After power, you need to hook up the thermocouple. My PID came with a nice K-type thermocouple with about 4 feet of braided-steel-encased wire, which is perfect for my setup, but not long enough. You need to be slightly careful about extending the wire, as variations in resistance will change the temperature reading. I just used about 6 feet of half decent speaker wire soldered to the original thermocouple wire, and it seems to be fine. Hook the + and - thermocouple wires to the terminals at the back of the PID. Pay attention to the polarity. If you have it backwards, the temperature reading will go down as temp rises, and things will go quite badly awry.
Relay and Hotplate Power:
My PID has an internal SSR output, basically it puts out 12vdc when it wants to be heating, and 0vdc when it doesn't. This is perfect, because it can serve as a trigger signal to the SSR with no modification. The Chinese instructions that came with the PID didn't make this super clear, so I wasted some time and effort hooking up a 12vdc trigger power supply that I didn't end up needing. Anyway, wire the positive and negative SSR outputs from the PID to the trigger side of the relay. Take the cord you want to use for the hot plate power supply and split one of the conductors, attaching each end to the output side of the relay. Now when the relay closes, you get mains current flowing through the hot plate. When it opens, the hot plate shuts off. Be aware that any time you have this plugged in, you WILL have live mains current in the hotplate power wire, even if the PID is not calling for heat.
FINAL ASSEMBLY:
Box all of this up inside the enclosure, hook up your high-amperage connectors to the hot plate and the relay, and you're ready to test. My PID has an auto-tune feature, but it doesn't seem to work very well for this application. Maybe it will work better for you... I have achieved pretty good control results through trial and error with P=3, I=1, and D=1. Very basic PID control theory is discussed here: wikipedia.
For best results, put the thermocouple right near the grate surface, but not touching either the grate or the meat. Plug in your thermometers and your dataloggers and have at it!
Here are a couple data plots from smokes I have done. You can see that the PID does a very good job controlling the temperature inside the smoker, even if the outdoor temperature changes significantly. The major changes in logged temp are either from me opening the smoker to poke at things, or from me changing the PID set point.
This plot was from earlier, when I hadn't got the PID values settled down quite as well:

This plot is a later smoke, with better temp control:

So far this whole setup has been very safe and reliable. As I said, Josh got zapped by the connector once. It has never caught fire on me, but it certainly could, so I never operate it within about 10 feet of the house, just to be safe.
UPDATE: I ended up putting a second burner in next to the original one, and I can hit temps near 400*F now. The only additional electronics I needed to deal with for the upgrade was to order a higher-amp rated SSR, and install a heat sink for it (I tried it once without the better relay and heat sink, and the whole thing melted down).
UPDATE2: I also ended up cutting up a weber charcoal grill grate to make it fit, which works better. The smoker I made for my dad is larger, and a regular weber grill grate fits in it perfectly without modification (I think his uses 21 or 22" planters). I also switched to the coil-style heating elements I mentioned in the build log. They do seem to both heat faster and last longer. I scavenged them from a couple of $15 hot plates I bought off of amazon.
UPDATE3: Hackaday picked this up, so I thought I'd add a few more pics. Pardon the mess, I forgot to put the tarp over the smoker, and it's been raining.


 9/17/12 update
here's a little time-lapse vid I made of me making 4 smoker brains for family members:
9/17/12 update
here's a little time-lapse vid I made of me making 4 smoker brains for family members:
Your blog works! And you are a dork.
ReplyDelete:) Looks nice though
Hey there, great way of expanding on a simple idea! im looking to do a setup very similar to what you have, been collecting parts. now its time to order the heart of the electrical components, which i admit i am terrible with! so looking for a little help on picking out the right items to order. actually i created this google account just to post on this blog and try to get some feedback where i need help. is there somewhere i can email you and send some links to see if im on the right track with my electrical components? Thanks in advance for anymore help you can give!
ReplyDeleteCan you pose a couple more pictures of the enclosure you're using for the PIC controller?
ReplyDeleteWow I did a double take on your PID enclosure, I used the exact same enclosure for my PID controller that holds my garage fridge at 68-70F for fermenting my beer! Your smoker controller and my fermenter fridge controller look identical next to each other.
ReplyDeleteNice build, I have a similar setup (also shamelessly 'borrowed' from A.B.). One comment I have on thermocouples - your extension method can work ok, but generally the best way to extend a TC is to use the same type of wire as the TC. Otherwise, each joint (or junction) actually becomes its own TC, which can cause some issues with the measurement. In practice though, as long as the temp of each of these joints stays constant, it isn't that big of a deal. Keep on Smokin'!
ReplyDeleteYes, you are correct. I forgot to mention that I replaced the jury rigged thermocouple with one that was long enough out of the box, and also nicely shielded with stainless steel braid.
ReplyDeleteThis comment has been removed by the author.
ReplyDeleteIde love to see a simple side view diagram of this, im about to move into a apt complex and would love to build one of these
ReplyDelete... temperaturecont.blogspot.com
ReplyDeletea writeup of my home-made electric smoker with PID temperature control, because it's slightly different from the standard version. http://thebestgrillsever.com/best-portable-infrared-grill
ReplyDeleteI see no one else has mentioned this, so: you absolutely would not have wanted to use a conventional electromechanical relay with PID control, because the constant and rapid cycling you need to be able to do for PID to work wall would destroy a mechanical relay in very short order. OTOH, especially in outdoor environments where ambient can get warm, one cannot have too large a heat sink on that SSR. They really can't be allowed to get warm...
ReplyDeleteWe provide Cartridge Heaters at very tight tolerances, low prices and fast Delivery. See your design, get a quote or purchase from the web.
ReplyDeleteThis comment has been removed by the author.
ReplyDeleteThanks to modern technology, homeowners can now enjoy the beauty and durability of hardwood floors without worrying about negative impacts on the environment. Advances in engineered hardwood flooring manufacturing in combination with increased amount managed hardwood Installation Harwood Flooring is resulting in a truly eco-friendly option in floor coverings
ReplyDeleteUnder floor Heating is a panacea for most of the problems faced by architects, interior decorators and the HVAC designers. As the saying goes heating and air conditioning should never be seen but only felt. Unfortunately due to a multitude of complexities faced by the above parties while implementing, in floor heat boiler most of the existing and emerging constructions, the opposite has been the end result.
ReplyDeleteAre you looking to make some DHL Mechanical calgary, or possibly remodel your home? Are you unsure where to start. There are many websites that offer you the capability of building your dream home online. Using these websites, you can go through the different rooms and select all the different designs and furnishings, as well as windows and lamp-shades for every part of the house.
ReplyDeletehello there boys it’s actually I am, Simply put I have fallen for a second time. Document haven?¯t been in this incredible website for many years since I have shed items private data, at the present I recently uncovered them back! Can miss all of you all of you seem to be our friends I presume all of you. Nice post! Happy Halloween Day 2018
ReplyDeleteIt was amazing and this idea was also very interesting. If you are looking for cork floor tiles,then you can contact cancork for more information.
ReplyDeleteDo you know how useful a home improvement profile is and how you can apply for it? Read on to find out.
ReplyDeleteOh! this is great idea for home made electric smoker with pid. it seems to be easy and affordable procedure. will try it.
ReplyDeleteDo you know how useful a home living room paint ideas loan is and how you can apply for it? Read on to find out.
ReplyDeleteWhat i don’t realize is in fact how you’re no longer actually much more smartly-liked than you may be right now. You are very intelligent. You understand thus significantly on the subject of this matter, produced me for my part imagine it from so many various angles. Its like men and women are not involved unless it is something to do with Lady gaga! Your personal stuffs nice. Always maintain it up! Pest Control In Abu Dhabi
ReplyDeleteBefore installation day, you will have consulted with your contractor on just the type of wood you want, and the finish you prefer. A hardwood floor can be a complement to an existing decor, More information it can form the foundation for entirely new interior decorating. White oak, maple, walnut, cherry, hickory and several other woods are available as an alternative to the standard red oak.
ReplyDeleteDo you know how useful a home Rattan furniture loan is and how you can apply for it? Read on to find out.
ReplyDeleteThis comment has been removed by the author.
ReplyDeleteThe life of commercial boilers, and residential boilers, is the maintenance you provide for the equipment. If you provide regularly scheduled maintenance to these devices they will last many years. Most of the units will run for ten or more years without ever needing any repairs. After they are ten years old they sometimes need minor repairs from time to time. The trick is maintaining them well so that minor repairs do not escalate into major repairs. smart homes in Vancouver
ReplyDeleteHave you ever had a cellphone that you dropped in a puddle? Or a laptop with a cracked screen? Sometimes, replacing the broken parts of your electronics is almost more expensive than just replacing the devices themselves. That's assuming you even know how to fix whatever parts need fixing to begin with! Unfortunately, if you don't, you just end up with a pile of useless, broken things. The goods news is that you can turn that pile of useless, broken electronics into a pile of money, if you know where to sell broken electronics. Motorola Fast Charging
ReplyDeleteHome improvement is a very widespread field, with many ideas from which to choose. During the summertime, countless people think about remodeling their homes, making improvements to certain rooms of the house, but are often not sure which improvements to do. vakantiehuis achterhoek
ReplyDeleteIn today's life, technology is increasing by leaps and bounds. The things which were regarded as impossible and unimaginable yesterday, is very much possible and practical today. Wholesale products are the latest talk of the town. Wholesale products cover almost all goods like electronics, gadgets, stationary, clothes and many more. underground civil supplies
ReplyDeleteToday instead of throwing old Electrician Oakland Ca away or recycling them, trade them in. There are some places online that you can send your old electronics too and receive cash. Some stores will allow you to trade your electronics in for credit on another product in their store. If you are trading in an outdated phone or just want to upgrade phone stores may take your older phone in for an upgraded model and give you credit toward the newer one. Some stores may buy your old electronics for cash.
ReplyDeleteThis comment has been removed by the author.
ReplyDeleteOn June 30, 2000, Congress enacted the Electronic Signatures in Global and National Commerce Act ("ESIGN" or "the Act"), to Shreveport electrician the use of electronic records and signatures in interstate and foreign commerce by ensuring the validity and legal effect of contracts entered into electronically. Yet many do not understand how their business can be compliant with the E-SIGN Act.
ReplyDeleteDocuments are rarely in the physical form these days. Most Electricians boca raton are being created in the electronic format, and even physical documents are being converted into electronic formats. Several devices, such as CD/DVD ROMs, floppy disks, hard drives and tapes, are being commonly used to store documents. Document transfer is also in the electronic form through e-mails or the Internet and intranets.
ReplyDeleteIt is true that the electricians tampafl medical record is indicative of a faster-paced informational age in which larger quantities of information require more effective database infrastructure, but there are many more benefits to both the medical service provider and the consumer. This informational article points out 10 benefits of an electronic medical record of which both practices and patients need to be aware.
ReplyDeleteI take pleasure in the comments on this blog, it really gives it that community feel! buy bedroom wallpaper
ReplyDeleteThanks for this excellent. I was wondering whether you were planning of writing similar posts to this one. .Keep up the excellent articles! https://btacquisitions.com
ReplyDeleteThanks for the post.Really thank you! Much obliged. apple keto gummies new zealand
ReplyDelete